Step 4. Run the S-Parameter Device Characterization Test
Running an off-state (zero bias) or on-state (biased) S-parameter test has three parts:
- Part A. Start the test
- Part B. (Optional) Check calibration
- Part C. Wait for test completion and view results
- Part D. Repeating measurements
Part A. Start the Test
To begin an S-parameter test:
-
Make sure that you have completed the previous set up and configuration steps:
-
Click the
 button. The software does the following:
-
Sets up the measurement channel and SMU according to the inputs you have specified and retrieves any files needed to run the test.
-
If you de-selected the Reset VNA before measurement option, the test runs. Skip to Part C. Wait for Test Completion and View Results in this procedure.
-
If the Reset VNA before measurement option is set, the software displays the Calibration Check dialog and opens the calibration wizard on the power analyzer. Follow the steps in Part B. (Optional) Check Calibration.
See Step 2. Configure S-Parameter Settings for information on the Reset VNA before measurement option.
-
Part B. (Optional) Check Calibration
Whenever the Reset VNA before measurement option is set, the software displays the Calibration Check dialog before running a test. This dialog lets you check the calibration for the Keysight E5080A ENA Vector Network Analyzer. 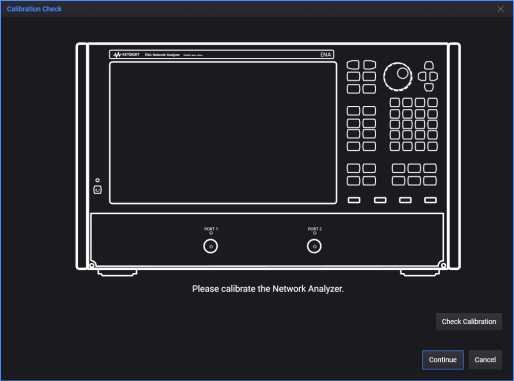
You may want to check calibration:
-
Before you first use the system.
-
Any time you have changed the configuration settings (frequency, power, sweep type, filter bandwidth, trace level, frequency sweep).
-
Periodically because test fixture contacts may degrade slightly over time, especially with frequent use.
To check the calibration:
-
Click Check Calibration. This opens the calibration wizard on the analyzer and adds four new buttons to the Calibration Check dialog. These buttons are designed to help you with the calibration procedure.

Optional controls:
-
Reset Calibration: resets the analyzer in case you have to recalibrate the fixture.
-
Cancel: Stops any calibration check and halts the test.
-
-
Use the calibration buttons to check that the network analyzer was correctly calibrated. (See Step 3. Calibrate the E5080A/B ENA for details on using the calibration wizard on the analyzer.)
-
To check the Open calibration:
-
Click Open to display the Open pattern:
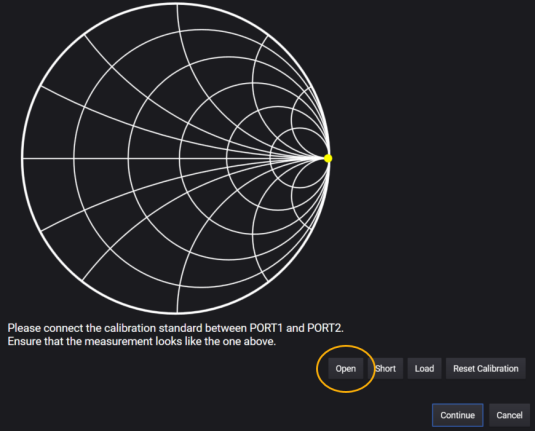
-
Insert the Open calibration standard into the test fixture. The pattern displayed on the analyzer should match the picture displayed in the Calibration Check dialog. If the two patterns match, the fixture is correctly calibrated.
-
-
To check the Short calibration:
-
Click Short to display the Short pattern:

-
Insert the Short calibration standard into the test fixture. The pattern displayed on the analyzer should match the picture displayed in the Calibration Check dialog. If the two patterns match, the fixture is correctly calibrated.
-
-
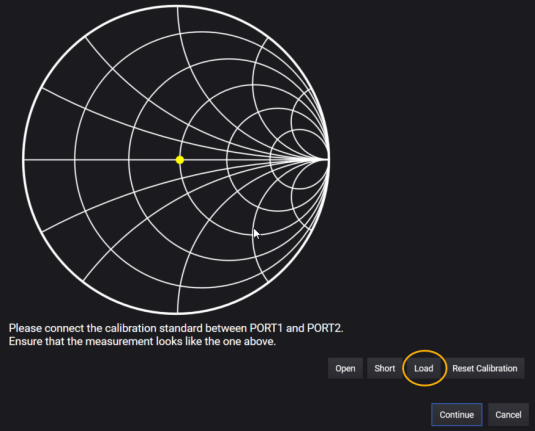
To check the Load calibration:
-
Click Load to display the Load pattern:
-
Insert the 50 W LOAD calibration standard into the test fixture. The pattern displayed on the analyzer should match the picture displayed in the Calibration Check dialog. If the two patterns match, the fixture is correctly calibrated.
-
-
-
If you are satisfied that the fixture is calibrated correctly:
-
Make sure that you remove all calibration standards and insert the DUT into the test fixture.
-
Click Continue. This closes the Configuration Check dialog and proceeds with the DUT measurement.
-
-
(Optional) If you find that the fixture is not calibrated correctly:
-
Click Reset Calibration to reconfigures the measurement channel to its default settings so that the calibration can start from a known state.
-
Repeat the calibration procedure in Step 3. Calibrate the E5080A/B ENA.
-
Re-run the test.
-
Part C. Wait for Test Completion and View Results
-
(Optional) To stop an active measurement, click the
 button.
 -
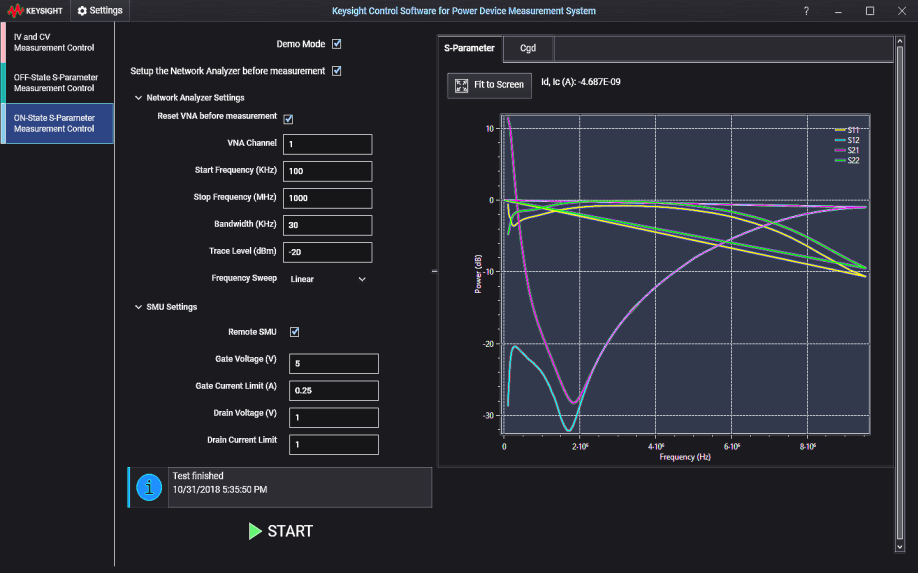
When the measurement is complete, the system displays the results curves in the data area of the main screen and on the network analyzer screen.
-
You can switch the view between Parameter and Capacitance curves (Cgd, Cds, and Cgs. See Data Display Features for more display options.

-
S-parameter measurement data is saved in .MDM file format in the folder that you specify in the Global Settings menu (Settings > Global Settings). See Output File Structure for more information.
Part D. Repeating Measurements
If you want to make measurements of another DUT at the same frequency, power, filters bandwidth and sweep mode:
-
Connect another DUT.
-
In the S-parameter test settings, deselect (uncheck) the Reset VNA before measurement option. This causes the PD1000A software to skip the automatic calibration check when you start the test.
-
Click Start to start the test. You can continue repeating the test without additional calibration as long as you do not change any of the test settings or use a different model of DUT.
Keysight recommends that you recalibrate the test fixtures periodically (even if you use the same configuration settings and the same kind of DUT for all tests. This is because the TO-220 and TO-247 test fixture contacts may degrade slightly over time, especially with frequent use.
See Also: